
Every Google Ads account leaks money on searches that were never going to convert - people looking for jobs, freebies, DIY instructions, used gear, or a competitor by name. Finding those one search term at a time is slow. Smart Blocklist does the finding for you: it cross-checks your search terms and your active keywords against a catalog of “junk” categories that Keyword Ninja curates in Hebrew and English, and hands you the matches as one-click block candidates.
The important idea: everything is checked by default. You don’t build a list from scratch - you review what surfaced and dismiss anything that actually fits your business.
Where to find it & plan availability
Open the menu and look under Optimize → Find waste → Smart Blocklist, or go straight to /dashboard/blocklist.
Smart Blocklist is a PRO and Enterprise feature. On lower plans the page still loads and shows you how many junk matches it found and how much they’re costing - so you can see what you’re missing - but reviewing and blocking them requires an upgrade.
Step-by-step walkthrough
1. Read the summary and the category panel
At the top you get two numbers - Block candidates and Potential waste (the total spend behind those candidates in the selected date range) - and a grid of junk categories. Each category card shows how many of your terms matched it and what they cost, so you can see at a glance where the waste is concentrated (in the example below, Comparison Shoppers alone is behind \$2,028).
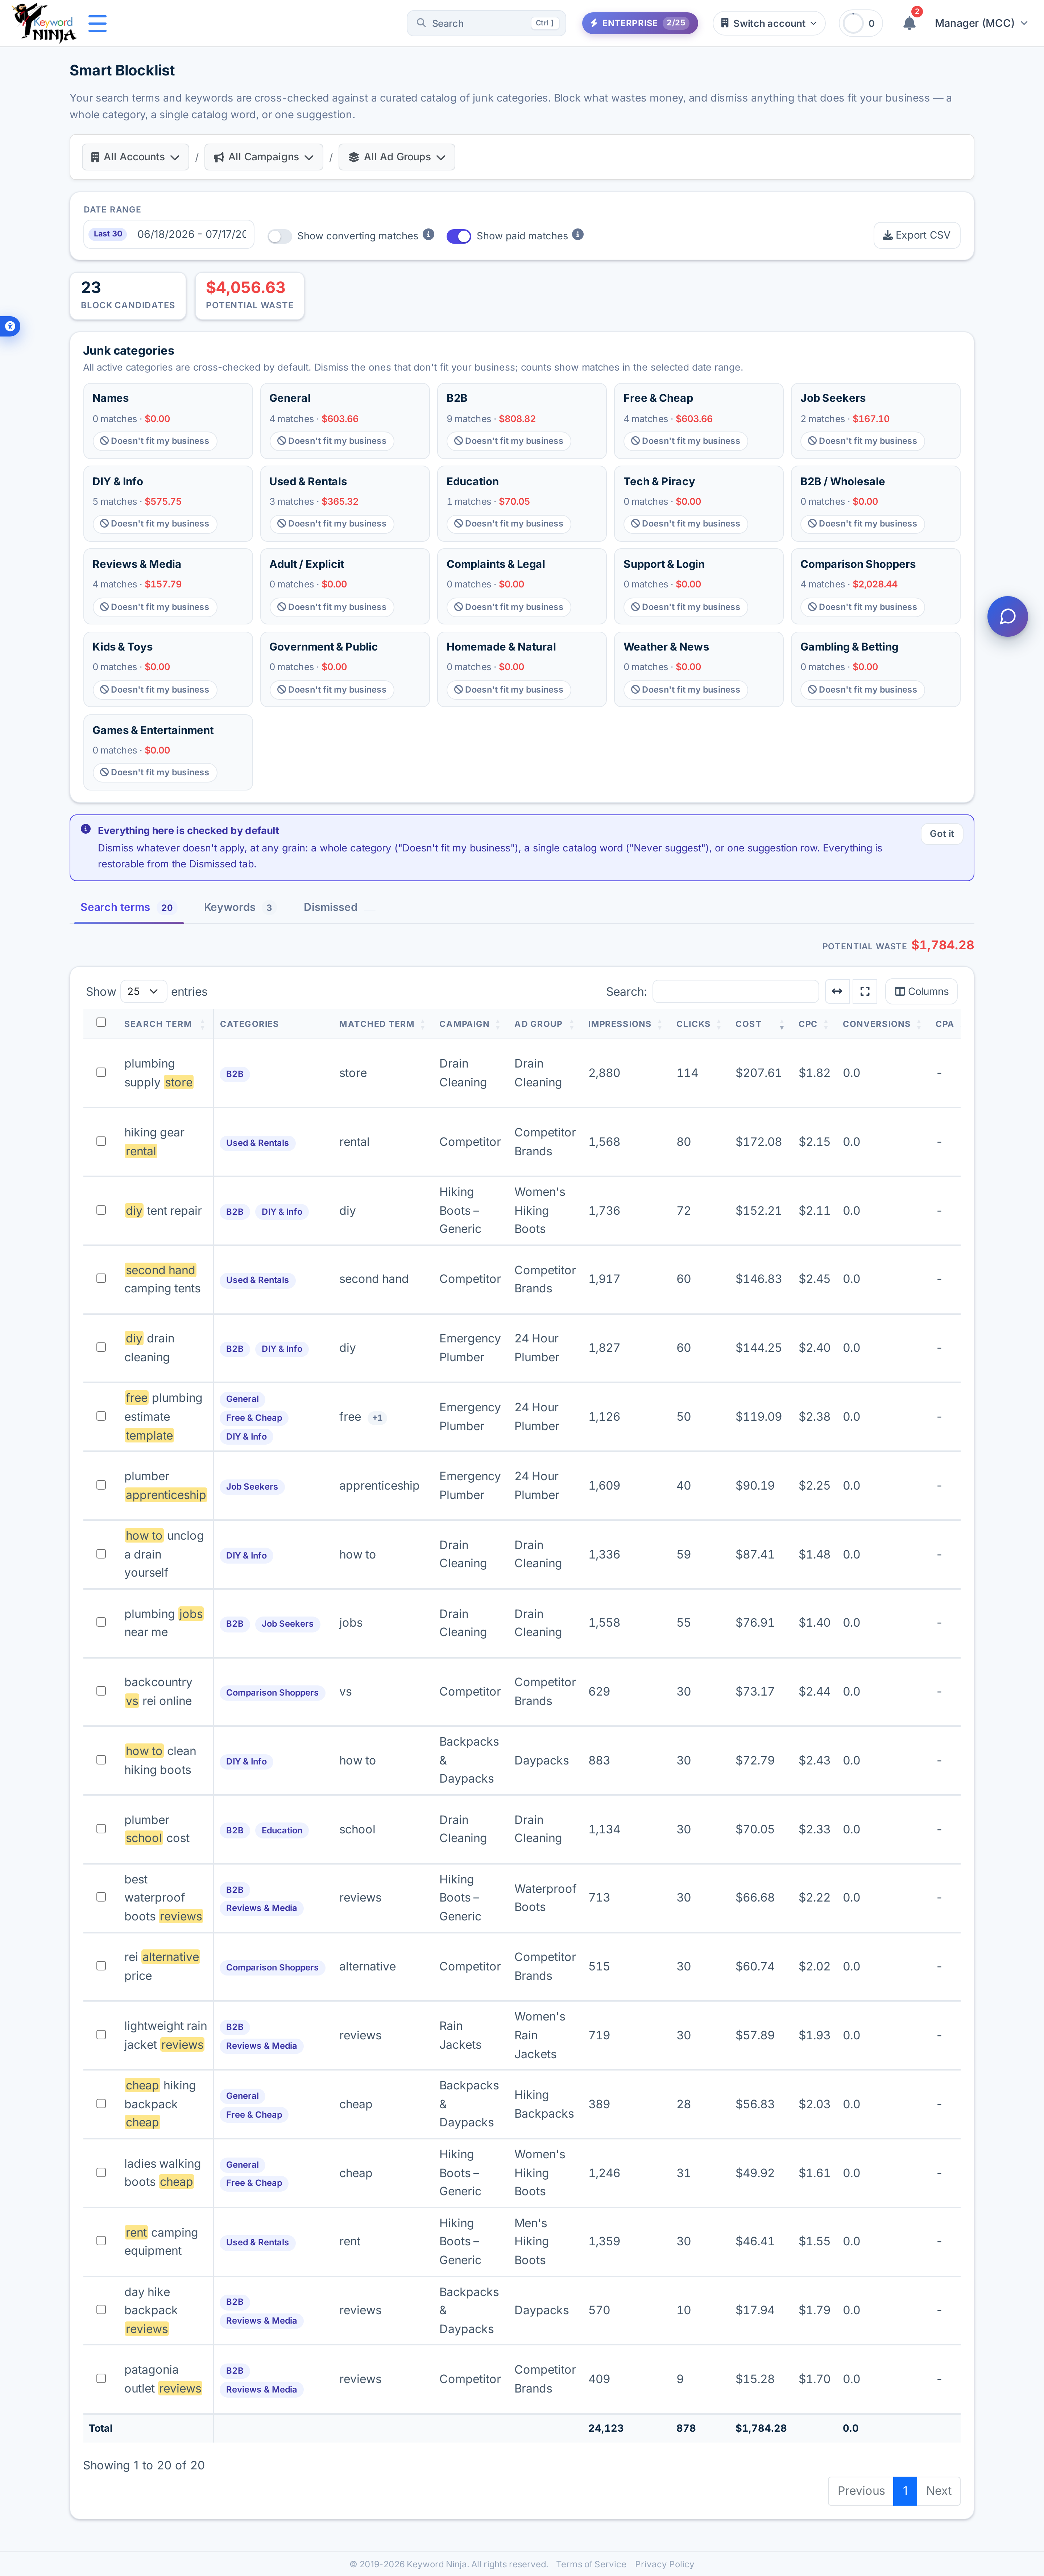
Below the panel, the Search terms tab lists every matching term. The catalog word that triggered the match is highlighted in the term and shown in its own Matched term column, alongside the campaign, ad group, impressions, clicks, cost, CPC, conversions, and CPA - so you can judge each candidate on its own numbers before acting.
Two toggles shape what you see. Show converting matches is off by default - terms that have actually converted are hidden, because blocking a converter can cost you sales. Show paid matches is on by default; turn it off to hide anything that hasn’t spent money yet and focus on real waste.
2. Dismiss what actually fits your business
Because everything starts checked, your first pass is about removing the noise. You can dismiss at three levels, and all of them are reversible:
- A whole category - click Doesn’t fit my business on a category card. If you are a used-gear shop, the “Used & Rentals” category shouldn’t flag your terms at all.
- A single catalog word - Never suggest “{word}” on a row silences just that word (e.g. keep “free” from ever flagging you again) without dismissing the whole category.
- One suggestion - dismiss a single row you don’t care about.
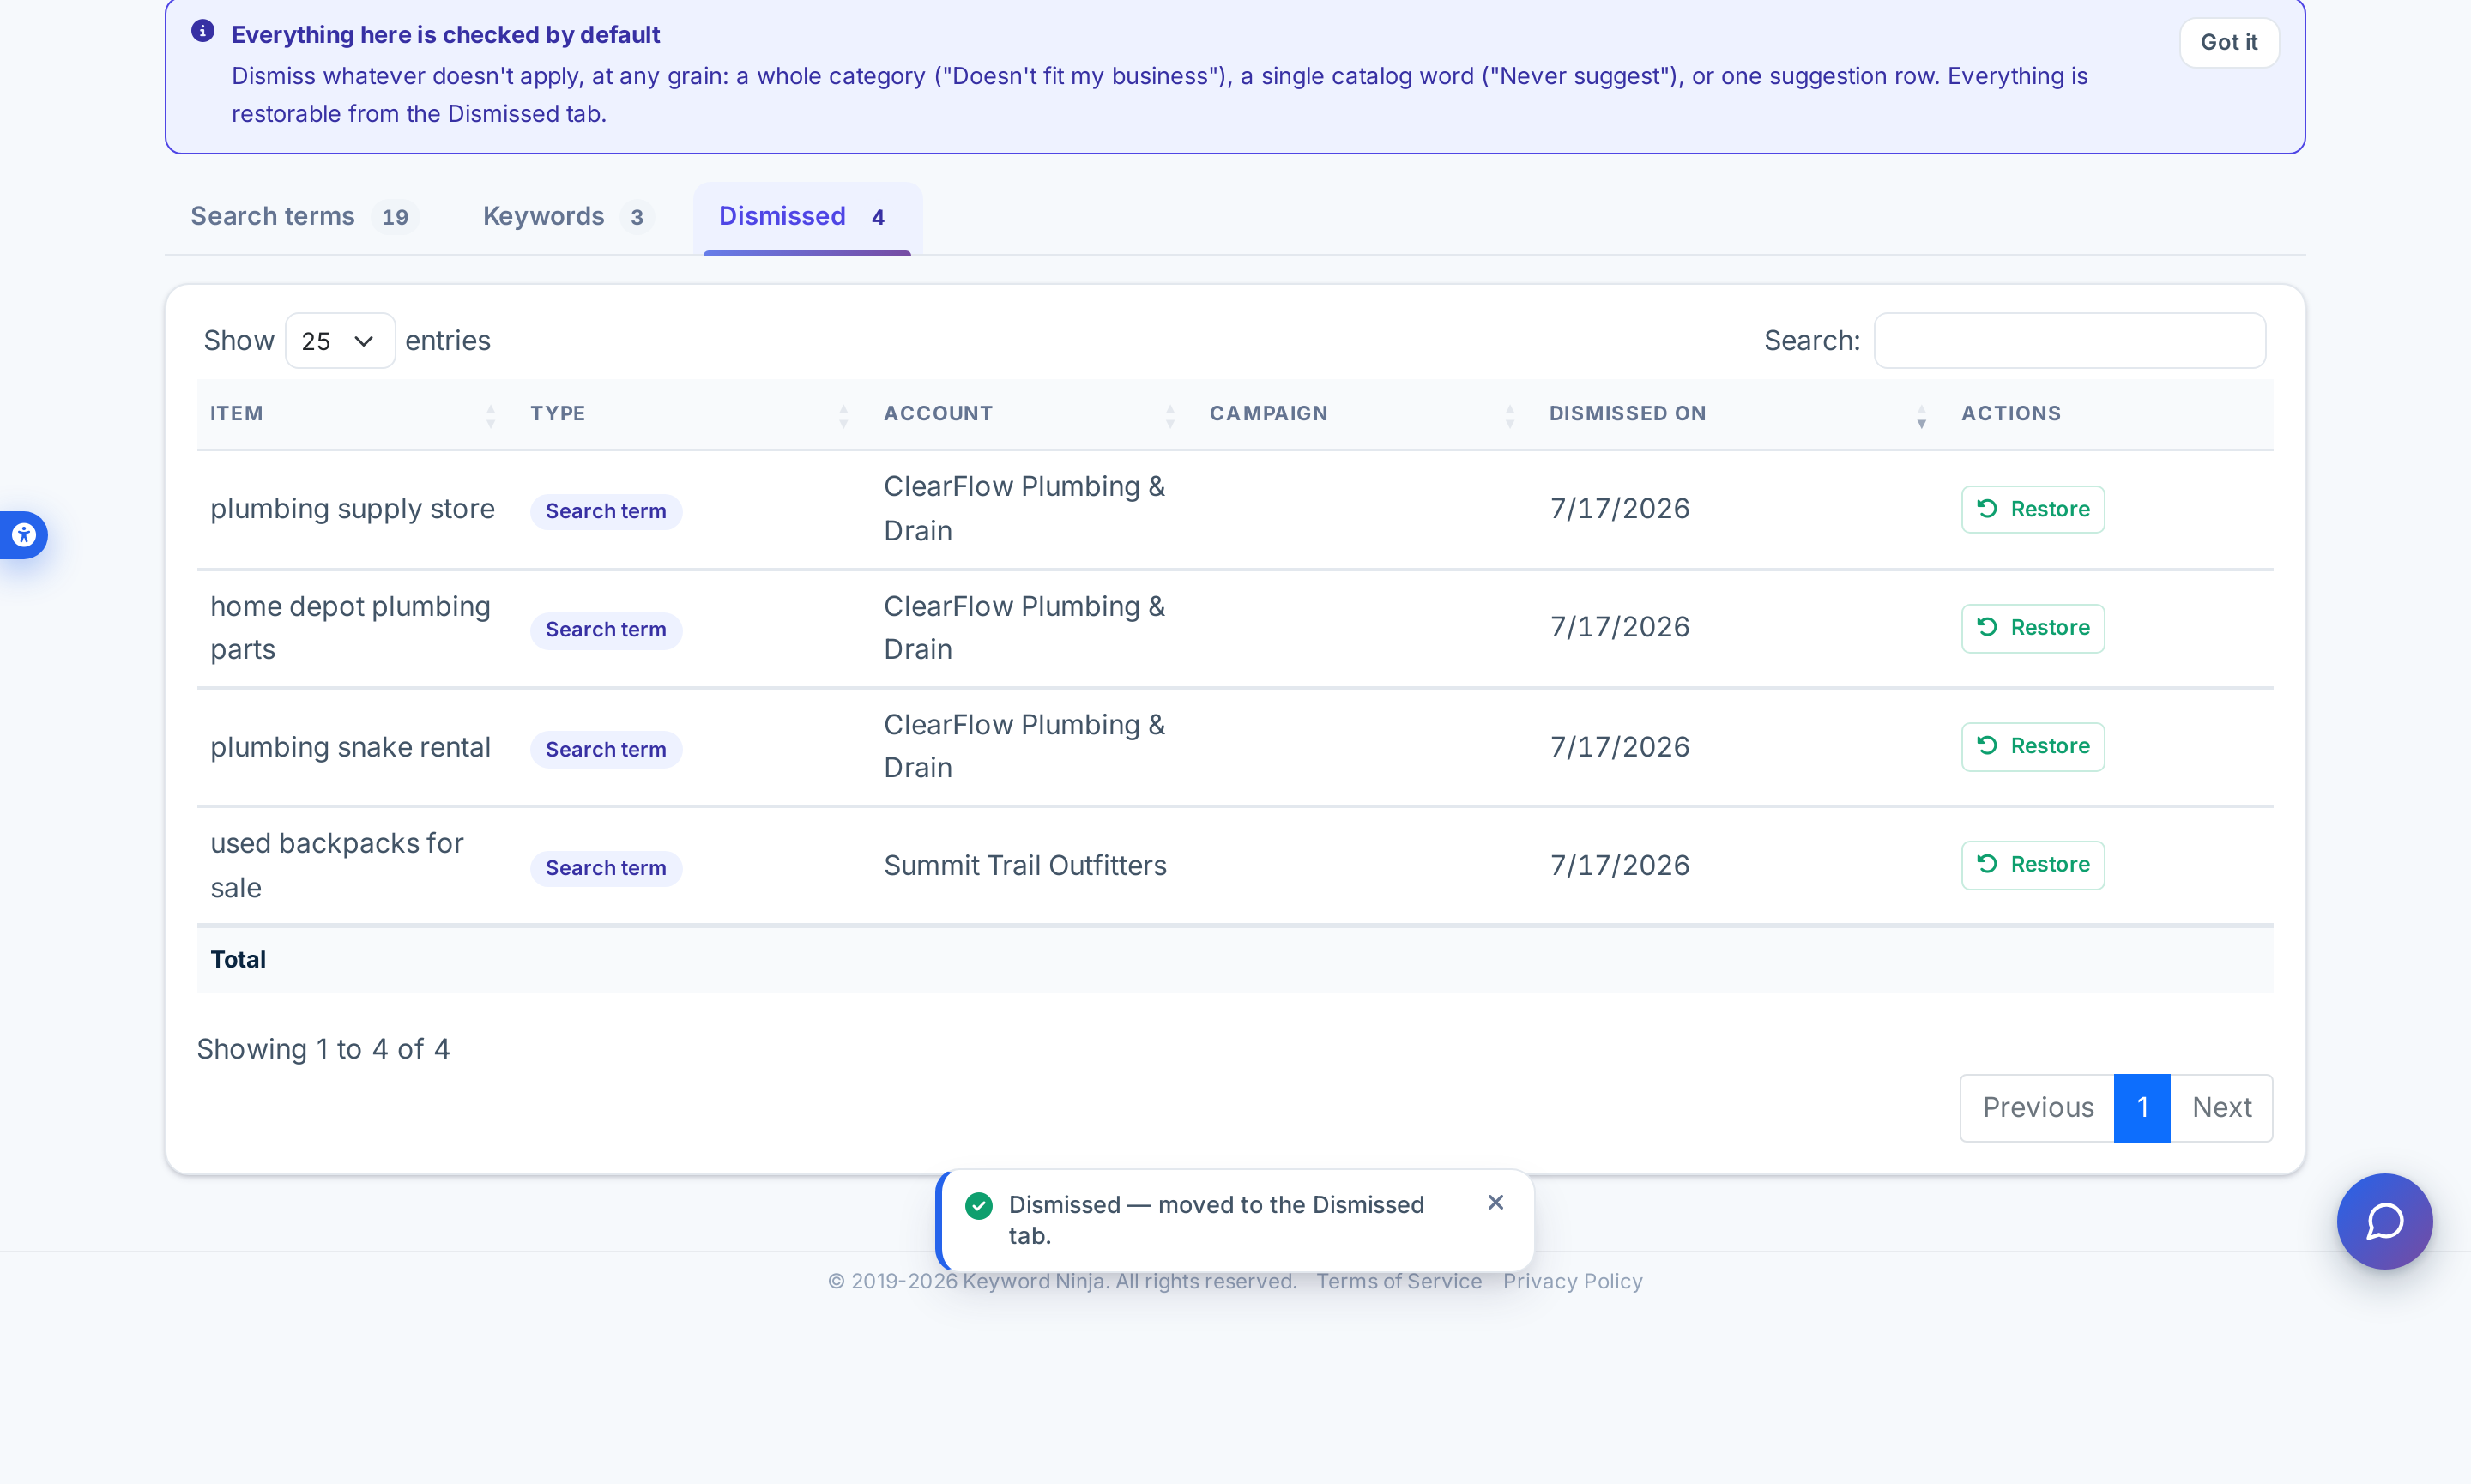
Everything you dismiss moves to the Dismissed tab, where you can restore it later (see step 5).
3. Block the waste
When a candidate really is junk, open its Block action. The confirmation modal gives you two choices:
- Block this exact term - adds the search term as an exact-match negative in the campaign shown, so only that query is blocked.
- Add the matched word as a negative (PHRASE) - blocks the underlying junk word (e.g.
store) as a phrase negative, which also catches future variations that contain it.
The modal shows exactly which campaign and ad group the negative will land in, so there are no surprises.
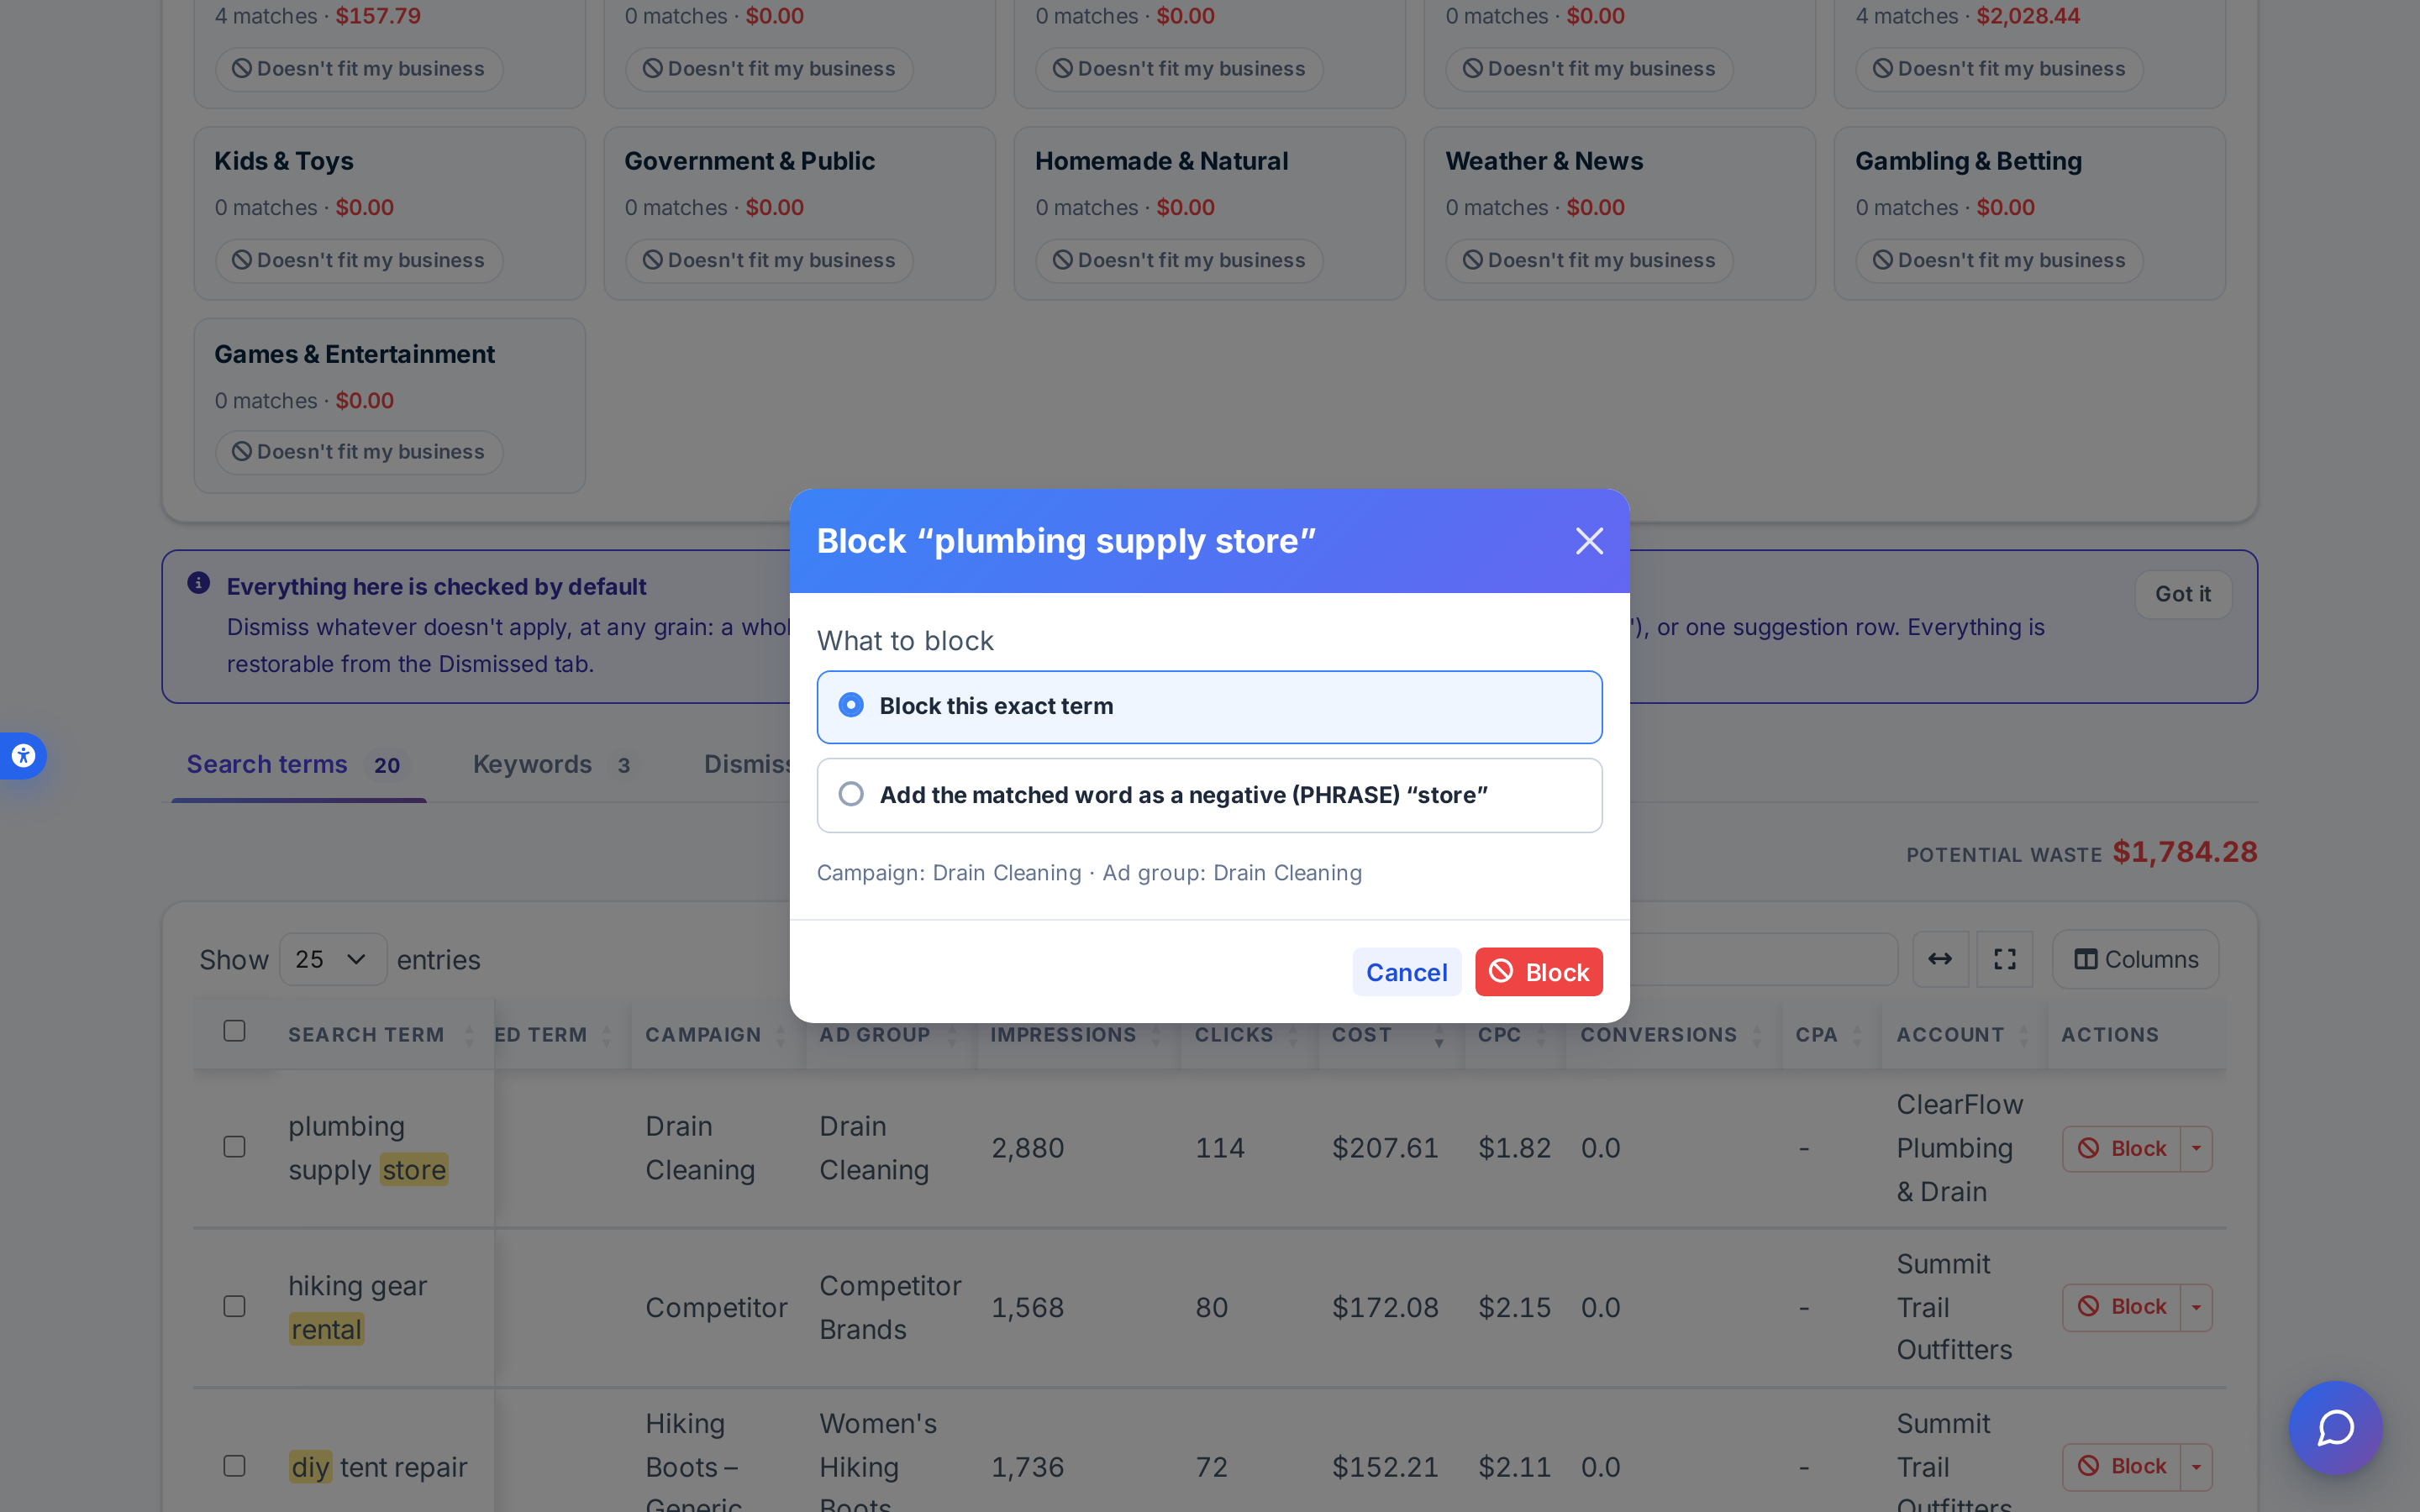
Every block is written straight to Google Ads and recorded in your Change Log, so if you change your mind you can undo it there. You can also select several rows and block them in one batch.
4. Check your active keywords too
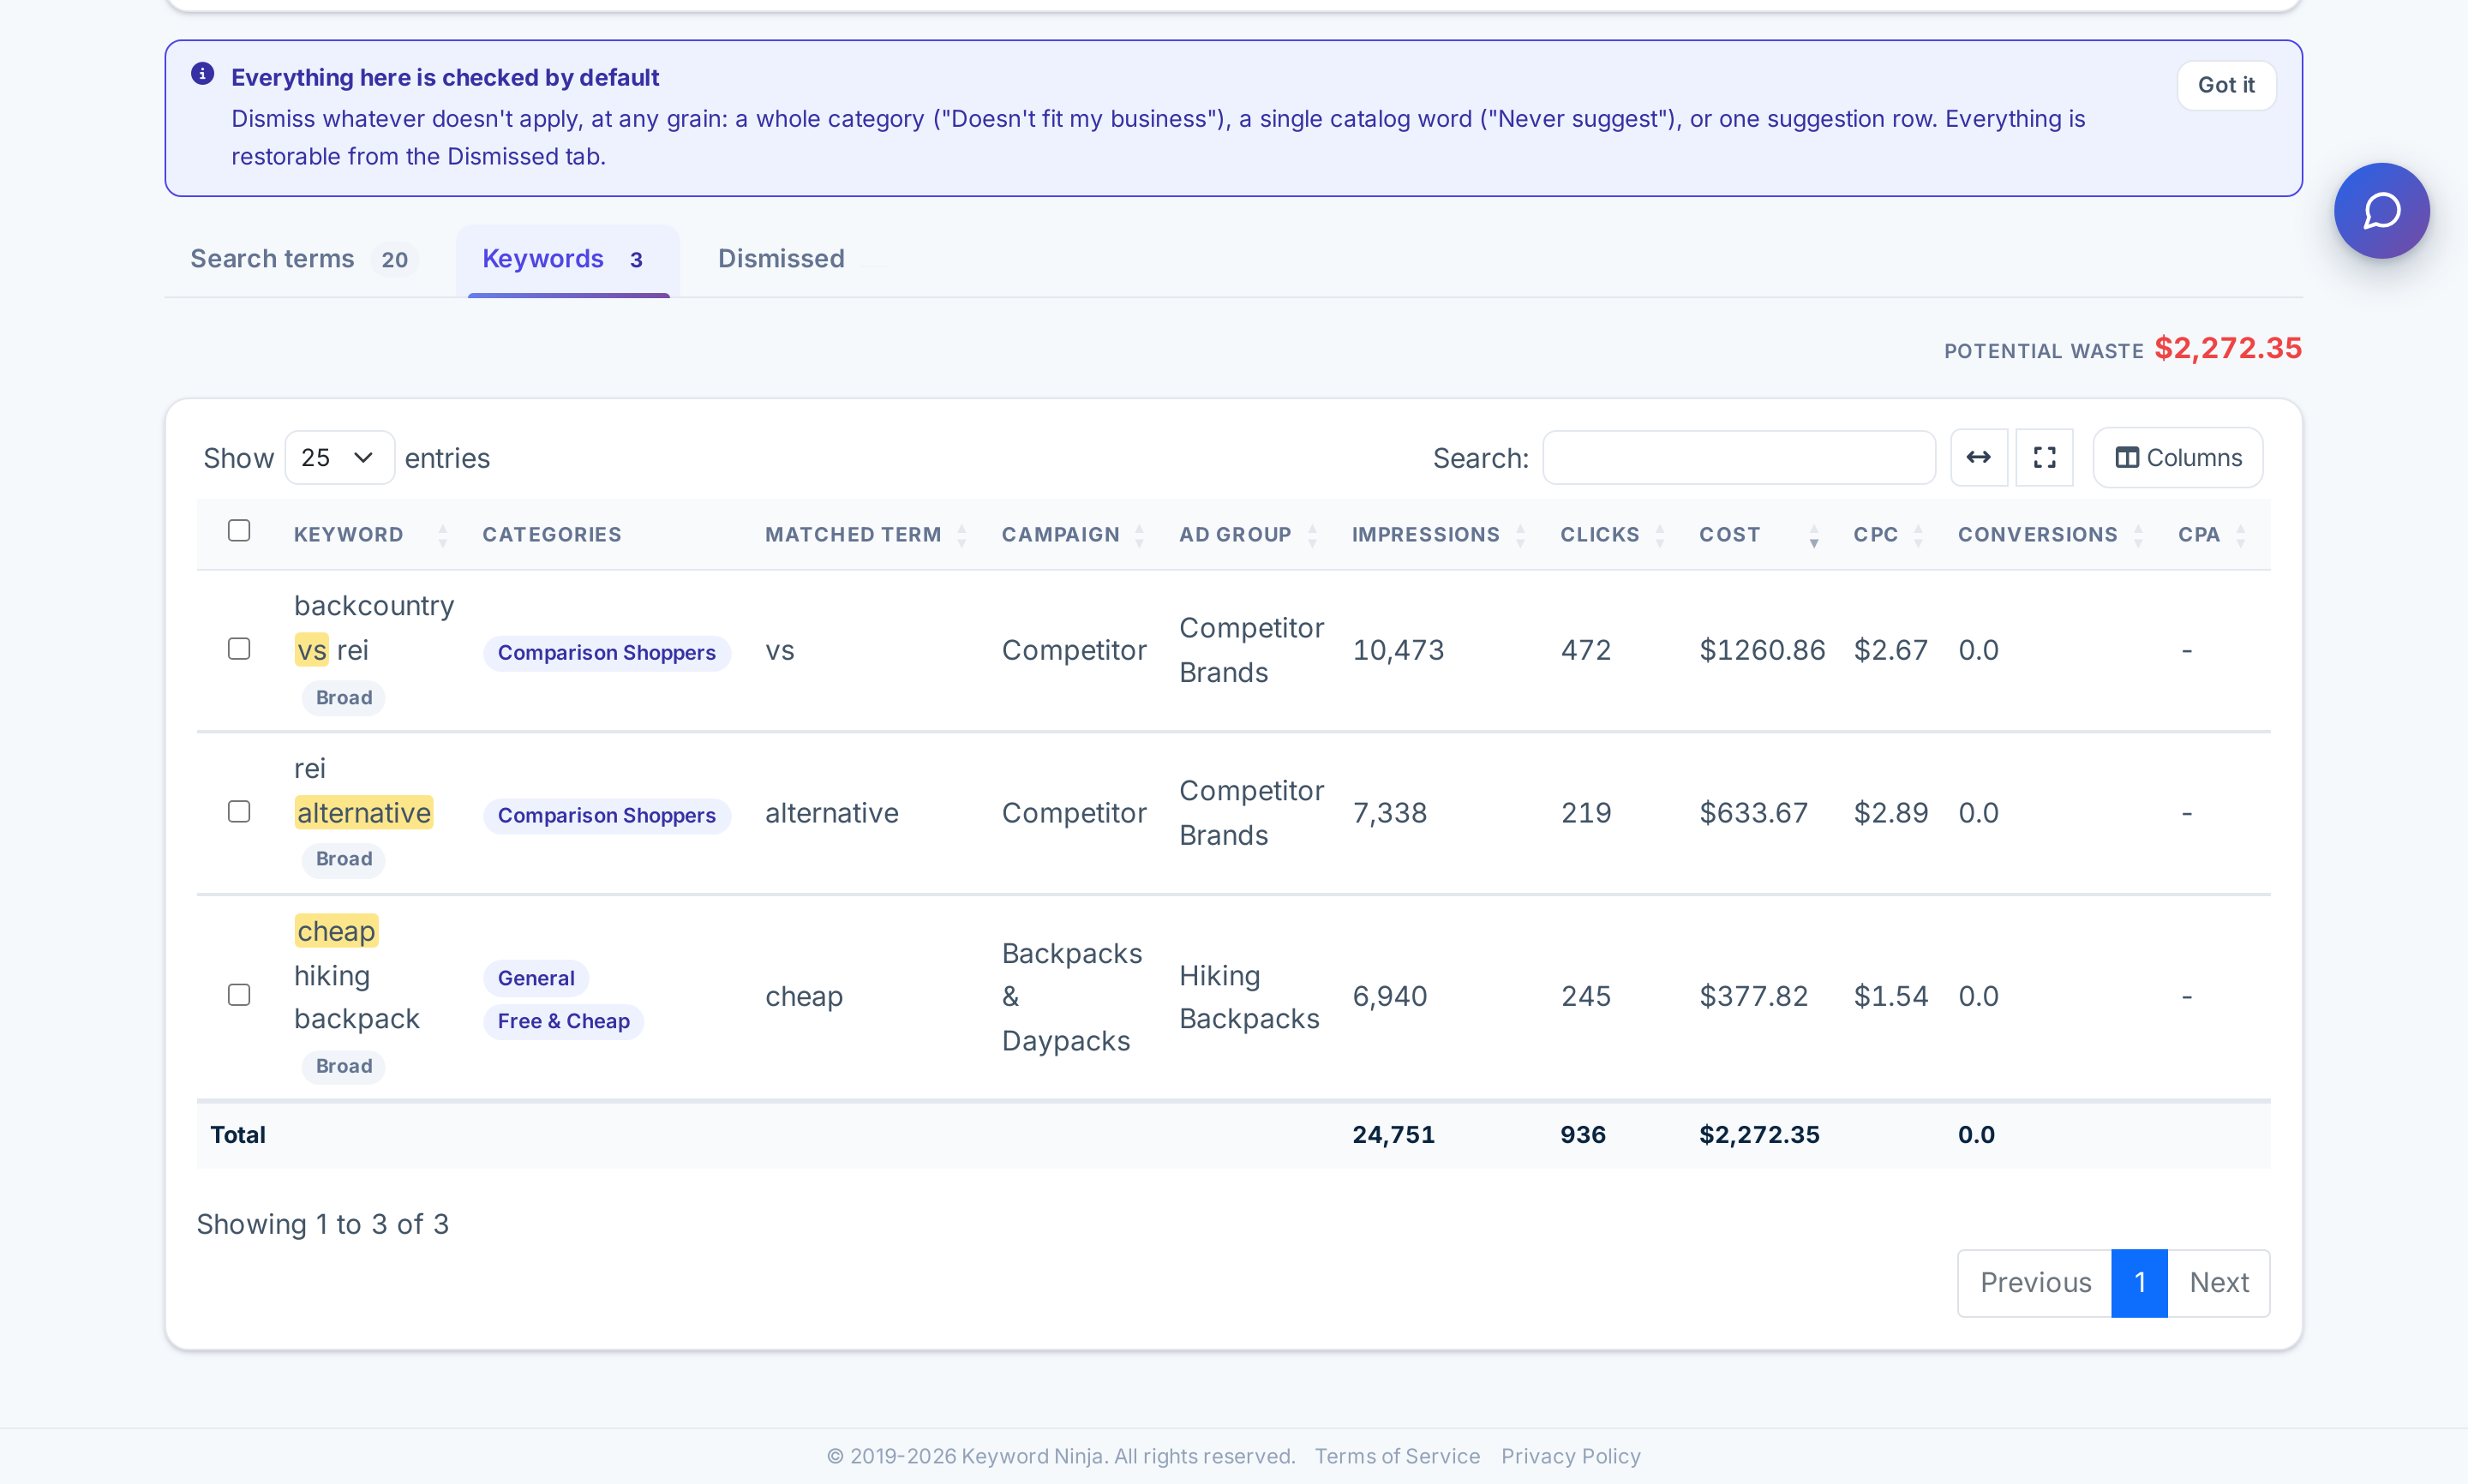
The Keywords tab runs the same cross-check against the keywords you’re actively bidding on - not just the search terms they triggered. A keyword that matches a junk category (like a broad-match keyword pulling in “cheap” or “vs” comparison traffic) shows up here with its own cost, CPC and category, and you can Pause it directly.
5. Review and restore from the Dismissed tab
Everything you dismiss - whole categories, single words, and individual rows - collects in the Dismissed tab. It’s your safety net: each entry shows what it was, which account it belonged to, and when you dismissed it, with a Restore button to bring it back into the cross-check. Nothing you dismiss is ever lost.
Tips & best practices
- Start by dismissing categories, not rows. A single click on “Doesn’t fit my business” for a category that’s irrelevant to you clears far more noise than dismissing terms one by one.
- Leave “Show converting matches” off unless you’re deliberately reviewing them - and when you do turn it on, treat the flagged converters with care rather than blocking on reflex.
- Prefer the phrase-word block for recurring junk. If the same word (e.g. “free”, “used”, “diy”) keeps showing up across many terms, blocking the word as a phrase negative stops future variations, not just today’s term.
- Use the Search box and column sorting to work the biggest wasters first - sort by Cost to attack the most expensive junk, and the Potential waste figure above the table updates to reflect whatever you’ve filtered to.
- Export to CSV if you’d rather review with a colleague or keep a record before you act.
- You can always undo. Blocks land in the Change Log and dismissals live in the Dismissed tab - so there’s no risk in doing a fast first pass and refining later.